
Cubase & Nuendo integration – Unleash your creativity
From plug-ins to mixer and transport, the deep Panorama integration with Cubase & Nuendo enables you to focus on creativity. A super transparent workflow makes it easy to navigate your project, tweak instrument sounds, effects parameters or mixer settings, all without constantly reaching for your mouse.
The high-resolution TFT display provides clear, concise parameter and navigation feedback. So it’s clear how each control is mapped. With many plug-ins pre-mapped and a unique learn function for modifying maps or creating your own, Panorama puts the power of Cubase and Nuendo in your hands.
GET IN TO THE MODE – ANYTIME
Panorama’s DAW control is activated with the mode buttons. Here you can switch between Mixer, Instrument and Transport modes to control different parts of your DAW. One button press completely reconfigure Panorama’s controls to focus on the selected mode. The 4th mode is Internal mode which takes you out of the deep integration with your DAW and allows you to use Panorama’s internal MIDI control options to, for example, control external hardware.
DISPLAY AND NAVIGATION
MAKES SENSE OF IT ALL
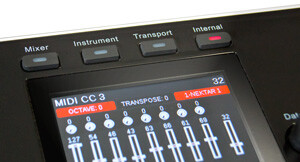
Navigation and parameter feedback makes all the difference to logical workflow. With Panorama you are never lost because all the important information is always right there, on the display. Here is an overview of how Cubase or Nuendo parameters and menus are displayed.

At the top, the info-line shows the parameter name and value for the control you are moving. The info-bar shows important navigational information such as Track name, Mixer Channel number and Device name. Here is where you find the assignments for the menu you have selected. The menu’s at the bottom shows what each of the 5 soft-key buttons below the display do.
FINDING YOUR WAY
Panorama’s navigation buttons are logically laid out and easy to get to. First there are 5 soft-key buttons under the display with functions that update depending on what menu you are in. The display tells you at any time either what parameter they control or what menu they will navigate to.
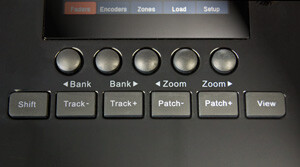
The 6 navigation buttons below, lets you step through the Reason sequencers tracks which in turn can change what mixer channel the auto fader is controlling or what device is controlled in Instrument mode. The Patch -/+ buttons change the patch of the current device with an added bonus in Instrument mode where the Data Control can also be used to fast scroll through device patches.
The view button changes what you see on your computer display with the mixer appearing in Mixer mode, the rack in Instrument mode and the sequencer appearing in Transport mode.
Using the Shift button additional functionality allows you to bank over blocks of 8 channels in Mixer mode so you can change assignments of the fader group from say ch 1-8 to ch 9-16. And when you are working in the sequencer environment you can use the zoom buttons to zoom in and out of elements.
CONTROLLING THE MIXER
IS LIKE OPERATING A MIXER
With its compact user interface and tactile control, Panorama gets to parameters so fast that it beats the mouse in many situations.
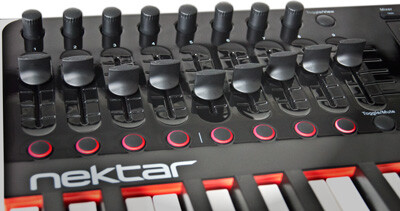
With the fader section, you can control 8 channels at a time. The first 8 faders operates channel volume with the Bank> and Bank< navigating 8 channels forward or back. The 8 encoders above the faders control pan by default but pressing the toggle button to the right of the encoders will change the encoders assignments to any of the sends 1-8.
The LED buttons below the faders can control solo, mute, record arm or track select for the current block of 8 channels. You can even define a channel starting point so you are not restricted to only control channels 1-8, 9-16 etc but can chose your block of 8 channels starting point (3-10,4-11 etc). The 9th fader controls Cubase or Nuendo master level.
CHANNEL STRIP CONTROL
The 8 encoders to the right of the display controls EQ parameters by default and the rest of the channel strip parameters through the soft-key menus at the bottom of the display.
Change the sequencer track and the channel strip follows but if you want to tweak the EQ on the kick drum track while continuing to play the bass line on your current sequencer track, just use the LED buttons for selecting the kick drum mixer channel and dial in the EQ.
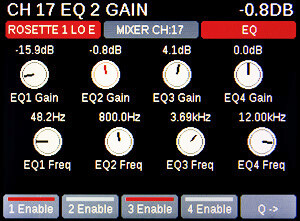
EQ POWER
Pressing the ‘EQ’ display button updates the screen to show the assignments of the 8 encoders to the right of the display. The main EQ section is laid out so all 4 main bands are accessible – gain and frequency can be adjusted easily and the 4 display buttons allow you to enable or disable any of the EQ bands.
The Q button changes the assignments of the bottom 4 encoders so you now can adjust Q for all bands Pressing that button one more time will take the view back to the previous view.
You can get back to the main mixer view at any time by pressing the illuminated Mixer button above the display. Although the EQ page is in the display, the rest of the controls in the fader section continue to operate as already described.
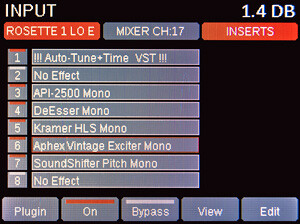
INSERT SLOTS
From the mixer home page you access the Inserts menu which gives you access to all 8 insert slots in Cubase and Nuendo. Moving the Data Control allows you to select the slot you want and the 8 encoders to the right of the display are immediately assigned. From here you can also select plugins by pressing the display button labeled PlugIn to toggle through selections or hold to use the Data Control to scroll through. Options for switching the slot on or off as well as bypass for the plugin are also included. Pressing View will open or close the plugin GUI on your computer display and finally Edit gives access to the navigation and parameter view of the plugin, right from Panorama.
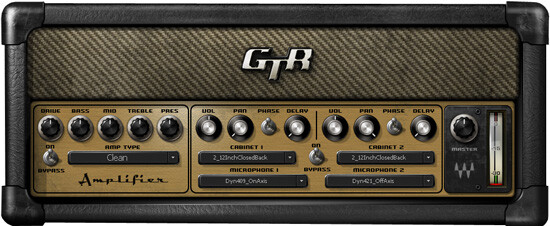
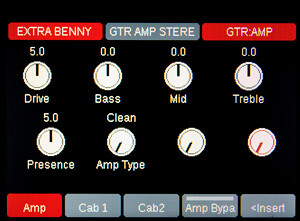
VST INSERT PLUGIN CONTROL
Panorama’s Cubase and Nuendo implementation comes with a long list of maps for VST plugins including all Steinberg products and major software developers such as Waves, Brainworx, Korg, Rob Papen to name a few. The Nektar created maps include logical navigation and formatting of parameter names so it’s easy to understand how it all works. Panorama can of course only read the parameters that are sent by a plugin but thankfully many are pretty complete. Here we show Waves GTR Stereo Amp VST insert plug-in controlled from Panorama. The amp controls are currently controlled by 8 encoders including Amp Type which is set to Clean. Pressing the display buttons labeled Cab1 or Cab2 will instantly assign the encoders to the controls for each of the cabs. All mapped out, so you don’t have to.
There are of course situations were a plug-in has not yet been pre-mapped but Panorama will automatically assign parameters in the order they are sent by the plug-m and even allow you to learn your own simple map which can be saved for use in all projects. In fact, if you don’t like the pre-mapping you can even use the learn function to reorganize the order of assignments so you have everything where you want it. You can find the complete list of pre-mapped vst plug-ins here: Inserts Instruments

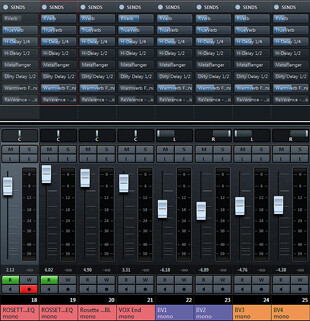
SENDS
Just like the Inserts menu, the Sends menu is accessed from the Mixer home page. Here you have access to all 8 sends for the currently selected channel and you can immediately change send levels using the 8 encoders. Better still you can activate a send, select and route to a plug-in without leaving Panorama. Just as with Inserts, each send slot can be selected using the Data Control.
PRO-CONSOLE CONTROL
The touch sensitive motorized fader is part of the channel strip so when you change sequencer track the fader therefore moves as channel volume changes from channel to channel. You can then move the fader to change volume setting and record automation. The two LED buttons follow the assignment of the motorized fader controlling Solo and Mute. Whether you are in Transport, Mixer or Instrument mode, you always have pro-console channel control within reach.
THE VST INSTRUMENTS YOU LOVE
WITH TACTILE CONTROL OF YOUR DREAMS
Panorama’s Instrument mode is a dream come true. Controllable parameters on VIs are mapped out logically so you don’t have to. Just focus on your music. Each instrument is presented in a home page that resembles a workstation environment.
Scroll through presets using the Data Control and Patch -/+ buttons or tweak the macro parameters assigned to the 8 encoders to the right of the display. Faders are by default assigned to envelopes (amp and filter on most instruments).
Controlling other parts of a VSTi is easily done by selecting from the pop-up menu and you even have the option to change the mapping using Panorama’s learn function. Let’s take a look at an example to see how it all works.


PREDATOR – BIG SOUND, BIG ON CONTROL
Rob Papen’s Predator VSTi allows control of pretty much every parameter and therefore illustrates perfectly how deep Panorama’s VSTi implementation is. Every single controllable parameter is mapped out from oscillators letting you change type to the modulation matrix and Arpeggiator.
The instrument home page display the status of some of the most useful parameters so you can tweak sounds without having to navigate deep in menus. The info-line displays the track name (Panorama Syn), the mixer channel the track device is routed to (Ch 1) and finally the track type (Instrument Track). As you select different Predator control menus from Panorama, the info-bar updates to show you where you are, at all times.
CUSTOMIZE WITH LEARN
If you want to assign different parameters on the VSTi plug-in home page, you can use the unique learn mode, right from Panorama. And it’s real easy too. Once activated you move a control on your VST plug-in and then move the control you want it assigned to. If the parameter is controllable, its name and value feedback will popup instantly on the Panorama display. From the learn menu, you can choose to clear assignments, save your map or just exit. Once saved, your map changes will be recalled every time you launch the VST plug-in that the map corresponds to. And better still, you can completely reorganize parameters in any page or menu available from Panorama.


POP-UP THE MENU
Moving the Data Control takes you deeper into Predator via a pop-up menu list so you can select exactly the area of the VST plug-in you want to work with. If, for example, Oscillators are selected, you will have access to all parameters related to Oscillator 1 and the option to select additional Oscillators. The faders are still assigned to control Amp and Filter envelopes but if you want to see the status, you just select Envelopes from the pop-up menu. The right hand encoders remain assigned to the menu you operated most recently. Selecting say the Arpeggiator menu works the same way so you get the idea by now. Notice that the right red Info-bar field display what menu you are in currently. It really is hard to get lost.

Predator Oscillator 1 – Osc1 Type selected

Predator Envelopes – Amp and Filter selected

Predator Arpeggiator – Sync set to on
REWIRE TO REASON
Running Reason ReWired to Cubase gives you the same deep integration control for both DAWs, from just one Panorama. A button combination allows you to switch DAWs in absolute real-time and display color coding tells you clearly whether the host or slave is selected. Reason ReWired to Cubase or Nuendo has never been a more integrated experience.

WANT MORE CONTROL? GET TWO!
If you want even more control, get a second Panorama to compliment your setup. Panorama devices can co-exist on the same computer but better still, with Nuendo or Cubase, each unit can control the environment completely independent of the other with the only limitation that control follows the track selected in Cubase. That means you could have one unit controlling Oscillators on a VSTi and the other controlling the Modulation matrix. Or you can of course control Reason with one Panorama and Cubase/Nuendo with another. With Panorama you are spoiled for options.